
If you’re already familiar with the basics of what Ansible is and how it works (and if not, I suggest reading my recent blog post explaining the basics of Ansible) you know it’s a powerful tool for automating IT tasks. But to truly unlock Ansible’s potential, you need to go beyond simple command execution and start creating dynamic, reusable configurations.
That’s where Ansible templates come in.
Ansible is a powerful automation engine that streamlines IT infrastructure management. One of its most flexible and crucial features is templating, which allows you to create dynamic configuration files, scripts, or any text-based output based on variables and conditional logic. This means you can maintain a single template file and populate it with different values for various environments or hosts.
In this blog post you will learn how to use Ansible templates to make your playbooks more flexible, scalable, and efficient than ever before, complete with an example you can try yourself.
How Ansible Templates Work
Ansible uses the Jinja2 templating engine under the hood. Jinja2 is a modern and designer-friendly templating language for Python, enabling you to embed expressions, control structures (like if/else statements and for loops), and variables directly into your template files.
For more information, please refer to the official Ansible documentation.
Here’s a breakdown of the key components:
1. The template Module
Ansible’s template module is responsible for processing Jinja2 templates. It takes a source template file, renders it with the provided variables, and then copies the resulting file to a specified destination on the remote host.
2. Template Files
These are regular text files (usually with a.j2 extension, but this is not required) that contain Jinja2 syntax. They can include:
- Variables: Marked by double curly braces
{{ variable_name }}. These will be replaced by their actual values during rendering. - Expressions: You can perform operations, string manipulations, or access object attributes within
{{ }}. - Control Structures: Enclosed in
{% %}. These allow for loops ({% for item in list %}), conditionals ({% if condition %}), and other logic. - Comments:
{# This is a Jinja2 comment #}are ignored during rendering.
3. Variables
Variables can come from several sources in Ansible:
- Inventory: Defined in your
hostsfile or inventory files. - Playbook Variables: Defined within the playbook using
varsorvars_files. - Host/Group Variables: Stored in
host_vars/orgroup_vars/directories. - Fact Variables: Gathered facts about the remote host (e.g.,
ansible_hostname,ansible_default_ipv4.address).
When the template module runs, it combines all these variables and makes them available to the Jinja2 engine for rendering.
Example: Dynamic Nginx Configuration
Let’s imagine you need to deploy Nginx configuration files to multiple web servers. Each server might have a slightly different configuration, perhaps serving a different port or root directory. Instead of maintaining separate Nginx config files for each server, we can use a single Ansible template.
The goal of this example is to have two nginx servers, with one nginx server running on port 8080 and the other one on port 8081.
Step-by-Step Guide
We will expand the directory structure we created in the first blog post in the Ansible series. As a reminder, we currently have this directory layout:
tim@pmox-ansible-01:/opt/ansible$ tree
.
├── ansible.cfg
├── inventories
│   └── webservers.yaml
└── playbooks
    └── deploy-nginx.yaml
In the Ansible playbooks directory, we will create a new subdirectory called templates. In this new directory, create a new file called nginx.conf.j2 and add the following content:
server {
    listen {{ nginx_listen_port }};
    server_name localhost;

    root {{ nginx_root }};
    index index.html index.htm;

    location / {
        try_files $uri $uri/ =404;
    }

    error_page 500 502 503 504 /50x.html;
    location = /50x.html {
        root html;
    }
}
This is a very basic nginx configuration file, note that we use two variables called nginx_listen_port and nginx_root in this template.
The next step is to assign a value to the variables. We will do this in the inventory file to keep everything neatly organized, so go ahead and open the inventories/webservers.yaml file and add definitions for these variables under each host:
webservers:
  hosts:
    pmox-web-01:
      ansible_host: 192.168.122.101
      nginx_listen_port: 8080
    pmox-web-02:
      ansible_host: 192.168.122.102
      nginx_listen_port: 8081
  vars:
    nginx_root: /var/www/html
To again demonstrate the difference between host variables and group variables, we have assigned the nginx_listen_port variable to each host because we want to run nginx on a different port per server. nginx_root is assigned to the group because we want this variable to be the same across the entire host group.
Finally we create the playbook that performs the installation of nginx and writes our custom nginx template. To do so, create a new file in the playbooks directory called deploy-nginx-with-template.yaml. For this playbook we can reuse a lot of what we previously wrote, the final playbook will end up looking like this:
---
- name: Deploys nginx with custom template
  hosts: webservers
  become: true
  tasks:
    - name: Install nginx
      ansible.builtin.apt:
        name: nginx
        state: latest
    - name: Write nginx configuration template to remote hosts
      ansible.builtin.template:
        src: templates/nginx.conf.j2
        dest: /etc/nginx/sites-available/default
    - name: Enable and start nginx
      ansible.builtin.service:
        name: nginx
        state: restarted
        enabled: yes
Save the file. Your directory structure should now look like this (files from the previous blog post are included too):
tim@pmox-ansible-01:/opt/ansible$ tree
.
├── ansible.cfg
├── inventories
│   └── webservers.yaml
└── playbooks
    ├── deploy-nginx-with-template.yaml
    ├── deploy-nginx.yaml
    └── templates
        └── nginx.conf.j2
Run the playbook using the following command from the /opt/ansible/ directory:
ansible-playbook playbooks/deploy-nginx-with-template.yaml -i inventories/webservers.yaml -k -K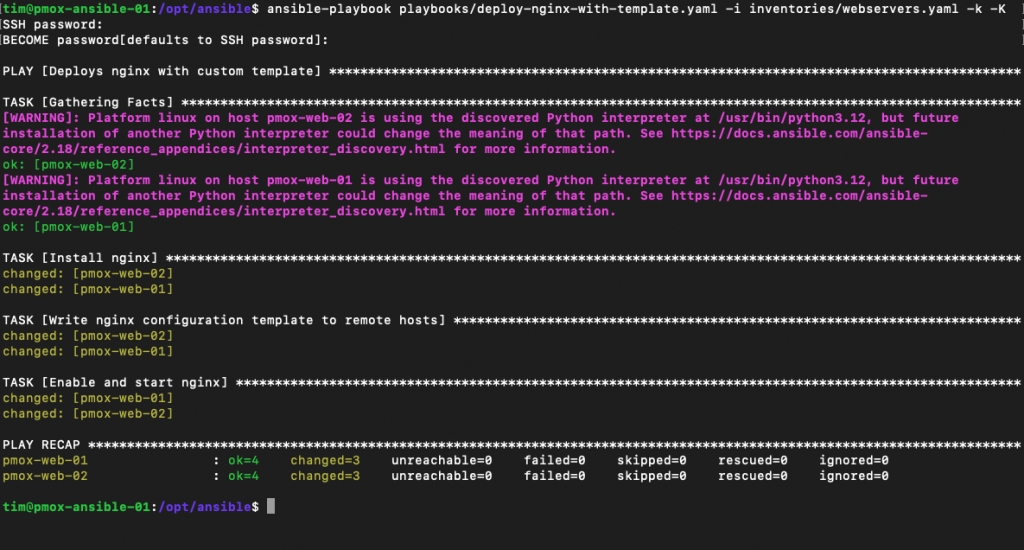
Congratulations, you have now used an Ansible template to deploy two nginx servers, with both listening on a different port!
No responses yet