
Learn Ansible from scratch in this beginner-friendly guide. Understand playbooks, inventory, and automate real-world tasks step by step (2025 update).
Introduction
In recent years the IT landscape has changed significantly. From the rise of the cloud to breaking up applications into microservices, nothing is the way it was a decade ago. One recent innovation in the IT landscape is the use of automation: automatically performing a series of tasks instead of performing manual work. An example of one of these tools is Ansible.
In this blog post we take a closer look at Ansible and take our first baby steps by automatically deploying NGINX on two servers. We will discover how Ansible works, which components are involved and how it can help you automate repetitive tasks with ease.
This post assumes you have no prior knowledge of Ansible. If you want to follow along and learn as you go, ensure you have two virtual machines (three if you intend to run Ansible on a dedicated server, which is recommended) and they are able to reach each other.
Ansible Terminology
Before we dive into the how’s and why’s, there are two Ansible terms you should be familiar with. An Ansible playbook is a YAML file describing the desired state of our infrastructure. An Ansible inventory is either a YAML or INI file containing (remote) servers the playbook should be applied to.
Don’t worry if these explanations make no sense at the moment, we will take a closer look at each component in the sections below.
Installing Ansible on Linux and other operating systems
This blog post is intended as a follow along and to learn as you go, so it only makes sense to start with installing Ansible! The section below explains how you can install Ansible on Ubuntu and Arch Linux, for other operating systems please refer to the official documentation.
Ubuntu
Ansible can be installed through various means, but the most common one for Ubuntu is adding the Ansible PPA repository to your system and installing Ansible through the PPA. The major advantage of this method is that you will be able to install a more recent version of Ansible than found in the default Ubuntu repositories.
Configure the PPA by executing the following commands.
sudo apt update
sudo apt install software-properties-common
sudo add-apt-repository --yes --update ppa:ansible/ansible
Finally, install Ansible.
sudo apt install ansibleArch Linux
Arch Linux provides Ansible in its default repository, so there is no need to perform any additional configuration. This is the advantage of a bleeding edge distro. Install Ansible through pacman:
sudo pacman -S ansibleOther distributions / operating systems
Please refer to the official documentation.
Verify installation
After successfully installing Ansible on your distribution of choice you can verify that Ansible has been successfully installed via the ansible --version command.
tim@pmox-ansible-01:~$ ansible --version
ansible [core 2.18.8]
  config file = /etc/ansible/ansible.cfg
  configured module search path = ['/home/tim/.ansible/plugins/modules', '/usr/share/ansible/plugins/modules']
  ansible python module location = /usr/lib/python3/dist-packages/ansible
  ansible collection location = /home/tim/.ansible/collections:/usr/share/ansible/collections
  executable location = /usr/bin/ansible
  python version = 3.12.3 (main, Jun 18 2025, 17:59:45) [GCC 13.3.0] (/usr/bin/python3)
  jinja version = 3.1.2
  libyaml = True
Ansible Inventory
As mentioned in the terminology section, an inventory is a file containing remote servers. This file can either be a YAML file or INI file, whatever has your preference. Think of an inventory file as a phone book of servers on which you want to apply automation: all the required information (name, IP address etc.) gets stored in this file.
Let’s take a look at a very simple inventory file in YAML syntax containing two web servers:
webservers:
  hosts:
    web01.example.com:
      ansible_host: 10.4.100.1
    web02.example.com:
      ansible_host: 10.4.100.2
The first line, webservers:, is a group. This group consists of the hosts web01.example.com and web02.example.com. Each host is assigned a variable called ansible_host, this is a special variable which tells Ansible the IP address of the server. This is especially useful if you do not have a local DNS configured.
You can assign any variable you like to hosts and even the group itself. Group variables should be assigned under the vars: section of the group.
In the inventory below, each host has an ansible_host variable. web01.example.com has an additional variable, called color. Finally, both hosts have an application variable, because this variable is assigned to the group the hosts are a part of.
webservers:
  hosts:
    web01.example.com:
      ansible_host: 10.4.100.1
      color: red
    web02.example.com:
      ansible_host: 10.4.100.2
  vars:
    application: nginx
Ansible Playbook
Now that we have covered inventories, we move on to where the magic happens: playbooks.
A playbook defines the desired state that we want on servers in our inventory file. This may sound a bit confusing at first. You should think of a playbook as a single source of truth, in other words: whatever we define in the playbook, should be how the remote host is configured.
The advantage of this “desired state” principle is that if no changes are needed and we already have the desired state on the remote host, Ansible will do nothing. Say, we are installing an application and a prerequisite is to create a directory called /opt/myapp/. We define in the playbook that this directory should exist and Ansible is executed. On one server, this directory does not exist yet. Ansible sees this and creates the directory. On another server this directory is already present, Ansible sees this and does not perform any changes and moves on to the next step.
Another example would be installing nginx. If nginx is already installed on the remote system, Ansible will not perform any changes and continue to the next step.
A step in Ansible is called a task, a playbook can have one or as many tasks as are required to get the job done.
Let’s take a look at the playbook below, which installs nginx on remote hosts.
---
- name: Install and start nginx on Ubuntu systems
  hosts: webservers
  become: true
  tasks:
    - name: Install nginx package
      ansible.builtin.apt:
        name: nginx
        state: latest
    - name: Enable and restart nginx
      ansible.builtin.service:
        name: nginx
        state: restarted
        enabled: yes
The playbook starts with a descriptive name of all the tasks that we will execute in the playbook. The next line, hosts:, specifies the hosts (or host group) where we want to apply the playbook on. The become: true statement indicates that elevated privileges (sudo) are required to do the tasks. Finally, we end up at the tasks: section which defines the actual tasks that we want to run.
To run tasks, we use Ansible modules. Ansible has many built-in modules and only for very specific use cases do you ever need a module that is not built-in by default. The playbook above invokes two modules: ansible.builtin.apt (managing apt packages) and ansible.builtin.service (managing services).
Each Ansible module has its own parameters, some are required to be provided whereas others are optional. To view all available parameters I strongly recommend vieweing the official Ansible documentation, they even include some example tasks to help you get started when you are using an unfamiliar module. Take a look at the ansible.builtin.apt documentation, you can see that this module supports many parameters, some of which you might not even need.
When I want to do something in Ansible but I am not sure which module to use, I simply Google ansible <thing I want to do>. Most of the time the module I am interested in is the first search result.
How Ansible connects to remote hosts
Ansible uses SSH to connect to remote hosts, so ensure SSH is enabled and that the remote hosts are reachable over SSH from the server where Ansible is installed on.
To authenticate, Ansible uses either an SSH key or password authentication. SSH keys are more secure and allow for a more hands-off automation, because for password authentication you have to provide the password every time you want to run a playbook.
By default, Ansible attempts to connect to remote hosts with the same user account as the one executing Ansible. If my user account is tim and I run Ansible, Ansible will try to connect to the remote hosts as tim. A different username can be set in the inventory file through the ansible_user: variable.
For production workloads it is recommended to create a separate Ansible user on both the Ansible controller and all remote hosts and use this user to execute Ansible, but since this is a beginners guide we will not be covering this topic.
Let’s use Ansible!
Now that you have some basic playbook and inventory knowledge let’s start using Ansible by creating a simple playbook that installs nginx, adds a custom index page and finally starts the web server. For our lab setup, I have three servers:
- pmox-ansible-01 (Ansible controller)
- pmox-web-01 (Web server 1)
- pmox-web-02 (Web server 2)
All servers run Ubuntu 24.04 LTS.
On the Ansible controller I like to have a separate directory to nicely organize all Ansible files. The root directory I use is /opt/ansible/ with two subdirectories: playbooks and inventories. If you want to follow along, create the same directory structure.
/opt/ansible/
├── inventories
└── playbooks
Let’s start with creating an inventory file. Because our inventory only contains web servers, let’s name it webservers.yaml and store it in the inventories directory.
webservers:
  hosts:
    pmox-web-01:
      ansible_host: 192.168.122.101
    pmox-web-02:
      ansible_host: 192.168.122.102
In the file above we specify the hostname and IP address of both servers. Both servers are part of the webservers group.
Before creating a playbook it helps to write down the exact steps (and in the correct order) that should be executed to achieve what we want to do. In our example, we want to do the following things:
- Install nginx
- Write some text to index.html
- Start nginx
We have already seen the modules we should use for step 1 and 3: ansible.builtin.apt and ansible.builtin.service. For step 2 we can use multiple built-in modules, but I prefer ansible.builtin.copy.
Let’s start by creating a file called deploy-nginx.yaml in the playbooks directory and start with the basic layout of a playbook: a descriptive name, on which host group we want the playbook to run on and if we need elevated privileges.
---
- name: Deploys nginx and add custom index.html
  hosts: webservers
  become: true
  tasks:
Next, let’s write the task that installs nginx. To achieve this we use the built-in ansible.builtin.apt module: we want to install the nginx package, with a state of latest (the most recent available version).
    - name: install nginx
      ansible.builtin.apt:
        name: nginx
        state: latest
Now we want to update the default index.html file that ships with nginx to something else. For Ubuntu systems, the default directory where nginx stores its web files is /var/www/html/ and the default index file is called index.nginx-debian.html. To use ansible.builtin.copy, we need to specify a destination file path and the content that we want to add to the file:
    - name: Update default index file with custom content
      ansible.builtin.copy:
        dest: /var/www/html/index.nginx-debian.html
        content: |
          <h1>Hello from Ansible!</h1>
Finally, we enable the nginx service to allow it to start upon a system restart, and set the state to restarted by using the ansible.builtin.service module.
    - name: Enable and start nginx
      ansible.builtin.service:
        name: nginx
        state: restarted
        enabled: yes
The entire playbook now looks like this:
---
- name: Deploys nginx and add custom index.html
  hosts: webservers
  become: true
  tasks:
    - name: Install nginx
      ansible.builtin.apt:
        name: nginx
        state: latest
    - name: Update default index file with custom content
      ansible.builtin.copy:
        dest: /var/www/html/index.nginx-debian.html
        content: |
          <h1>Hello from Ansible!</h1>
    - name: Enable and start nginx
      ansible.builtin.service:
        name: nginx
        state: restarted
        enabled: yes
Save the playbook and exit the file.
Before we can run the playbook there is one more thing we need to do. Because Ansible uses SSH to connect to remote hosts and our server has not previously connected to the remote servers yet, we will get some security warnings:
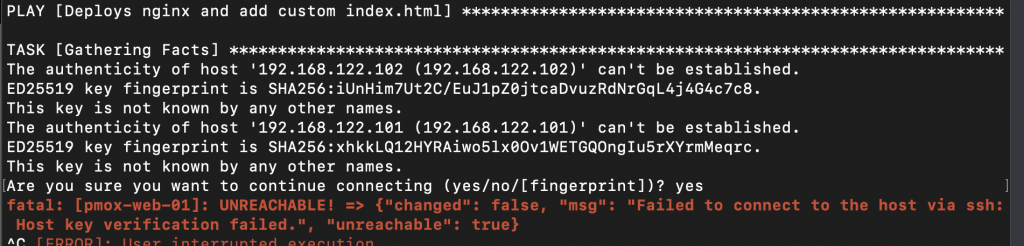
To fix this, create a file called ansible.cfg in the Ansible root directory (/opt/ansible/). We can disable host key checking by adding the following to the file:
[defaults]
host_key_checking = False
Now we can finally run Ansible! We will run Ansible using password authentication. To do this, issue the following command from the /opt/ansible/ directory:
ansible-playbook playbooks/deploy-nginx.yaml -i inventories/webservers.yaml -k -KThe -i flag specifies which inventory file we want to use. the -k flag means we want to be prompted to enter the password for the remote user, and the -K flag is the same but for the sudo password.

Enter the password for the remote user and press enter, you will now also be prompted for the sudo password.
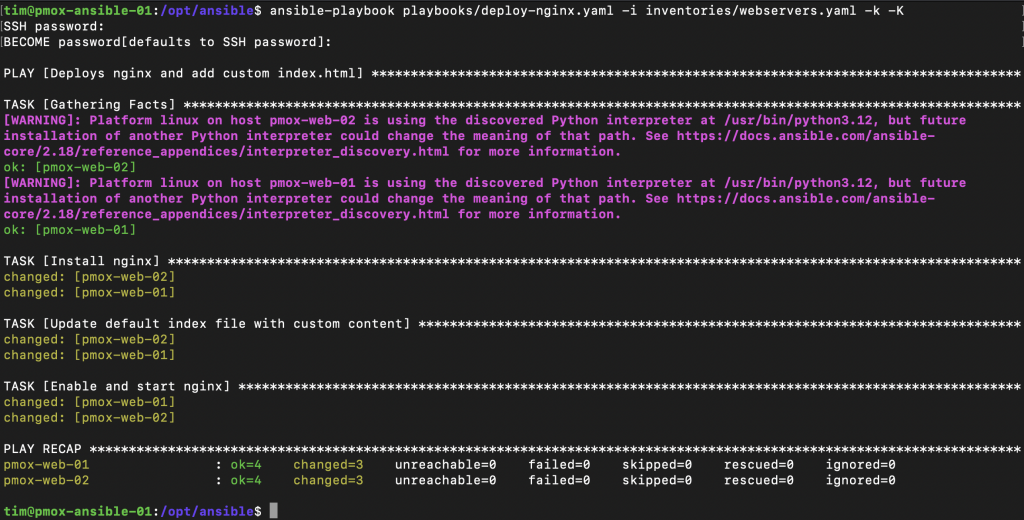
Ansible will now execute all the tasks in the playbook. In Ansible’s output you can encounter these messages:
- ok – No change needed on the remote host
- changed – A change has been applied on the remote host
- unreachable – The remote host is unreachable
- failed – Executing the task failed
- skipped – This task was skipped on the remote host
- rescued – This task was rescued on the remote host
- ignored – This task was ignored on the remote host
At the end of the output you get a recap, showing exactly how many things were changed on the remote hosts. Congratulations on running your first playbook!
Where to go from here
Ansible is an extremely powereful tool and has many moving components like templating, roles and Galaxy which are not explained in this post. Now that you have a basic understanding of Ansible you should be able to create simple playbooks to automate some repetitive tasks.
In later blog posts we will dive into powerful Ansible features such as templates and roles. For now I hope you enjoyed reading this post and learned a thing or two.
Update: the second part of the Ansible series is now live, where we will dive into Ansible templates!
No responses yet